How to add a Table Of Contents (TOC) to Gatsby WordPress

In this guide, we will learn how to implement a Table Of Contents in a Gatsby website with WordPress. A Table Of Contents (or TOC) is a fundamental tool to show our users how we have structured an article. Thanks to a Table Of Contents, which is nothing more than a clickable list of links to all the headings within our article, users will be able to navigate within the article more easily. This is not only better for the user but is also a good practice for SEO. In fact, search engines like Google usually reward websites that make easy the navigation of their content to users.
That said, we finally see in practice how to create a Table Of Contents within our Gatsby site, without having to install any WordPress or Gatsby plugins.
Prerequisite
Before we begin, we must have linked our Gatsby site with WordPress through the gatsby-source-wordpress plugin. If you have not already done so, you can see our article that briefly explains how to use WordPress as a source for your Gatsby website.
Since we will not install any plugins, we need to install cheerio which will help us to parse the content of the article and generate the various links to the headings that we will use to create the Table Of Contents list. To install cheerio we simply need to run:
npm install --save cheerioTable Of Contents with Gatsby-Source-WordPress
At this point, we get to the heart of the matter. All the changes we are going to make from this point are inside the gatsby-node.js file. In detail, to create a Table Of Contents in Gatsby WordPress what we need to do is:
- create a
tocfield in theWpPostresolver which will return the JSON with the list of links to the page headings - modify the
contentreturned byWpPostso that the headings have the ids that the links of the Table Of Contents will point to - be sure that all generated ids are unique
- create a “tree” structure of the headings to be able to render it in a React component
GraphQL Schema Customization
First, we need to modify the original gatsby-source-wordpress schema and create a toc field which will return the Table Of Contents through GraphQL queries. Another very important aspect is to create an extension of the content field in order to return the HTML content of the posts with the modified headings.
To do so, we use createFieldExtension, createTypes and createResolvers to create an extension of the content field and to declare the toc field. Everything is exported by default in the gatsby-node.js file:
exports.createSchemaCustomization = ({ actions }) => {
  const { createTypes, createFieldExtension } = actions;
  createFieldExtension({
    name: "content",
    extend: extendContentField,
  });

  const typeDefs = `
    type WpPost implements Node {
      toc: JSON
      content: String @content
    }
  `;
  createTypes(typeDefs);
};

exports.createResolvers = ({ createResolvers, schema }) =>
  createResolvers({
    WpPost: {
      toc: {
        resolve: createTableOfContents,
      },
    },
  });
Let’s now see the extendContentField and createTableOfContents functions, that it’s where the beauty is.
The createTableOfContents function uses the cheerio module to parse the content of the post and to find every heading (H2, H3, H4, and H5 tags). Subsequently, for each heading, we check if an ID is already present. If so, we do nothing. Else, we create an ID starting from the heading text and making sure that the ID is unique:
async function createTableOfContents(source, args, context, info) {
  const $ = cheerio.load(source.content)
  const titles = $('h2,h3,h4,h5')
  const getUniqueId = UniqueId()

  const headings = Array.from(titles).map(title => {
    const depth = parseInt($(title).prop('tagName').substr(1), 10)
    const id = createId($, title)
    return { url: `#${getUniqueId(id)}`, title: $(title).text(), depth }
  })

  const reduced = groupHeadings(0, [], headings)
  return { items: reduced }
}
The extendContentField function, similarly, also makes use of the cheerio module to parse the content and to map the headings. The only difference is that this time, the function returns the new HTML content of the posts where every heading has a unique id:
function extendContentField(options, prevFieldConfig) {
  return {
    resolve(source) {
      const $ = cheerio.load(source.content)
      const titles = $('h2,h3,h4,h5')
      const getUniqueId = UniqueId()
      Array.from(titles).forEach(title => {
        const id = createId($, title)
        $(title).attr('id', getUniqueId(id))
      })

      return $('body').html()
    },
  }
}
Create unique Headings ID
To create unique Headings ids we are using two functions: createId and UniqueId. The Table Of Contents will be a list of links pointing to headings with a specific id inside the blog posts. It’s extremely important to have unique ids or the browser will not scroll the page correctly after the link is clicked.
To create the heading ids, we use the createId function:
function createId($, title) {
  let id = $(title).attr('id')

  if (!id) {
    id = $(title)
      .text()
      .toLowerCase()
      .replace(/[^a-z_0-9]+/gi, '-')
      .replace(/-+/g, '-')
  }

  return id
}
To make sure every id is unique for each page query, we use the UniqueId function:
function UniqueId() {
  const tempMap = {}
  return el => {
    if (tempMap[el]) {
      tempMap[el] = tempMap[el] + 1
      const result = `${el}-${tempMap[el]}`
      tempMap[result] = 1
      return result
    } else {
      tempMap[el] = 1
      return el
    }
  }
}
Nested Table Of Contents JSON items
Last but not least, we need the recursive groupHeadings function that we use to nest every heading based on their depth property:
function groupHeadings(index, grouping, headings) {
  if (index < headings.length) {
    const nextHeading = headings[index]

    if (grouping.length) {
      const prevHeading = grouping.slice().pop()

      try {
        if (nextHeading.depth > prevHeading.depth) {
          prevHeading.items = prevHeading.items || []
          return groupHeadings(index, prevHeading.items, headings)
        } else if (nextHeading.depth == prevHeading.depth) {
          grouping.push({ ...nextHeading })
          return groupHeadings(++index, grouping, headings)
        } else {
          throw { index: index, heading: nextHeading }
        }
      } catch (higherHeading) {
        if (higherHeading.heading.depth == prevHeading.depth) {
          grouping.push({ ...higherHeading.heading })
          return groupHeadings(++higherHeading.index, grouping, headings)
        } else {
          throw higherHeading
        }
      }
    } else {
      grouping.push({ ...nextHeading })
      groupHeadings(++index, grouping, headings)
    }
  }

  return grouping
}
At this point, we are finally ready to test the implementation. Go to your WordPress and create a new post with tons of headings: be sure to create “logic” nested headings (this means you should not create an H4 after an H2). Something like:
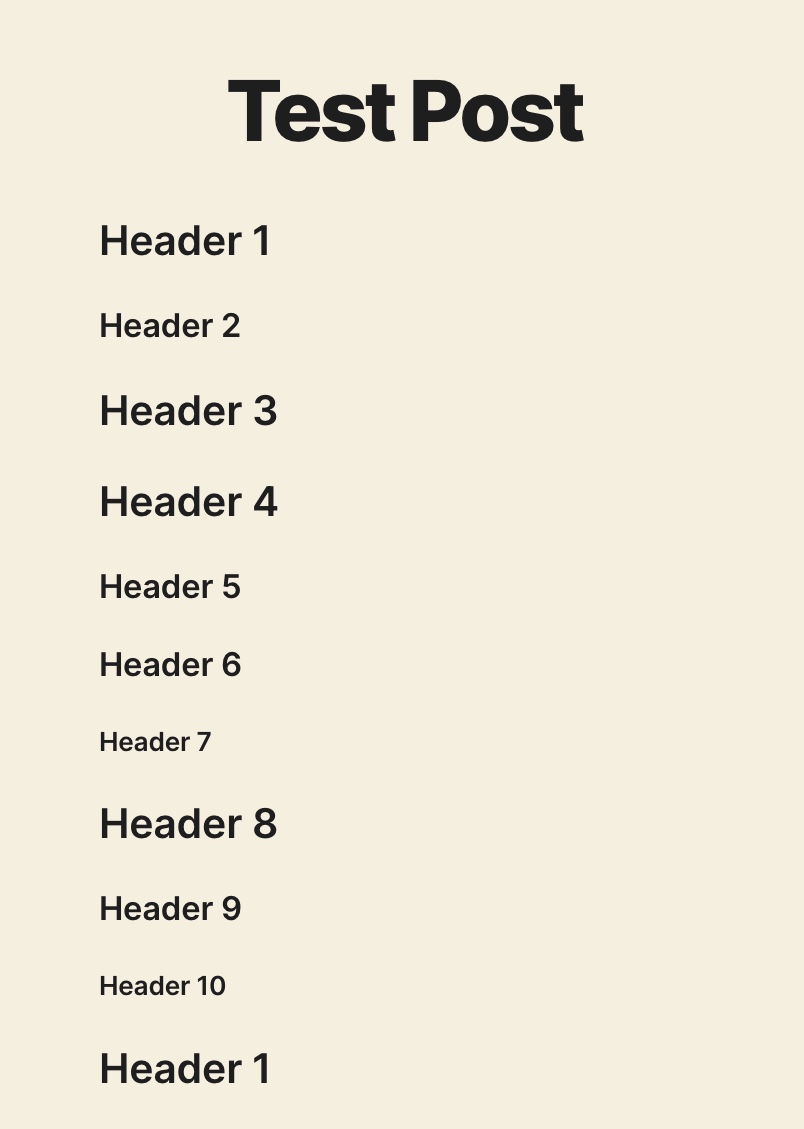
Run the gatsby develop command and test the wpPost query. The response will look similar to this:
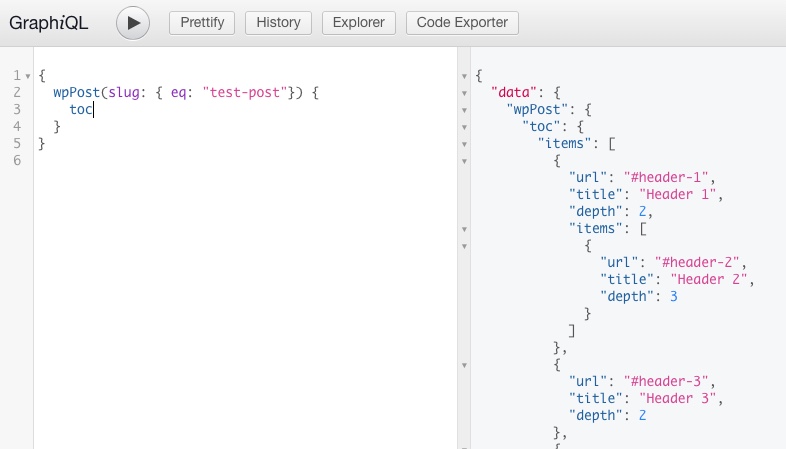
Full JSON response of the query:
{
   "data": {
     "wpPost": {
       "toc": {
         "items": [
           {
             "url": "#header-1",
             "title": "Header 1",
             "depth": 2,
             "items": [
               {
                 "url": "#header-2",
                 "title": "Header 2",
                 "depth": 3
               }
             ]
           },
           {
             "url": "#header-3",
             "title": "Header 3",
             "depth": 2
           },
           {
             "url": "#header-4",
             "title": "Header 4",
             "depth": 2,
             "items": [
               {
                 "url": "#header-5",
                 "title": "Header 5",
                 "depth": 3
               },
               {
                 "url": "#header-6",
                 "title": "Header 6",
                 "depth": 3,
                 "items": [
                   {
                     "url": "#header-7",
                     "title": "Header 7",
                     "depth": 4
                   }
                 ]
               }
             ]
           },
           {
             "url": "#header-8",
             "title": "Header 8",
             "depth": 2,
             "items": [
               {
                 "url": "#header-9",
                 "title": "Header 9",
                 "depth": 3,
                 "items": [
                   {
                     "url": "#header-10",
                     "title": "Header 10",
                     "depth": 4
                   }
                 ]
               }
             ]
           },
           {
             "url": "#header-1-2",
             "title": "Header 1",
             "depth": 2
           }
         ]
       }
     }
   }
 }
Create a Table Of Contents React component
The final step is to create the react component to render the Table Of Contents. In the following example, we use the renderTableOfContentItems function to recursively render all the sub-elements of each list:
interface TOC {
  url: string
  title: string
  depth: number
  items?: TOC[]
}

interface TableOfContentProps {
  toc: { items: TOC[] }
  className?: string
}

const renderTableOfContentItems = (items: TOC[]) => {
  return (
    <ol>
      {items.map(({ url, title, items }) => (
        <li key={url}>
          <a href={url}>{title}</a>
          {items && items.length && renderTableOfContentItems(items)}
        </li>
      ))}
    </ol>
  )
}

const TableOfContent: React.FC<TableOfContentProps> = ({ toc, className }) => (
  <aside className={className}>
    <h2>Table of contents</h2>
    {renderTableOfContentItems(toc.items)}
  </aside>
)
This simple component creates an ordered list with a link for each heading within the article content.