Export MySQL data to Amazon S3 using Lambda and Python

AWS documentation officially recommends exporting a MySQL database to Amazon S3 using the Data Pipeline service, but what if we want something a bit more dynamic? In this article, we will see how to backup a MySQL database and save it in an Amazon S3 bucket using a simple script written in Python. Also, we will use AWS Lambda to execute the Python script and AWS Event Rule to schedule the Lambda execution.
In this project we will:
- create the Python script to export MySQL data to the S3 bucket;
- containerize the Python script in a Docker image;
- create the Elastic Container Registry image and push the Docker image;
- create the CloudFormation stack template;
- the complete CloudFormation template.
Create the Python script to export MySQL data to the S3 bucket
First, we need to write the Python script to export the MySQL data to the Amazon S3 bucket. To be fair, it’s better to specify that we could use any other programming language instead of Python, like, for example, NodeJS. Indeed, the only thing that we will do through the script is to execute the mysqldump command and upload the exported data to an Amazon S3 bucket, and this can be accomplished with pretty much every scripting language.
Also, because we are developers and lazy by definition, we want to make a reusable service. In the end, we will be able to back-up multiple MySQL databases into the same S3 bucket simply by generalizing small pieces of code.
That’s said, let’s go to the script. In just a few lines of code, we are running the mysqldump command to export the database and the AWS CLI to upload it to an Amazon S3 bucket. Also, note that every information is passed to the script using environment variables:
import subprocess
import os
import time
import json

S3_BUCKET = os.environ['S3_BUCKET']

timestamp = time.strftime('%Y-%m-%d-%I:%M')


def handler(event, context):
    print("Function started")

    DB_HOST = event['DB_HOST']
    DB_NAME = event['DB_NAME']
    DB_USER = event['DB_USER']
    DB_PASS = event['DB_PASS']

    print("%s %s ".format(DB_HOST, DB_NAME))

    command = "mysqldump -h %s -u %s -p%s %s | gzip -c | aws s3 cp - s3://%s/%s.gz" % (
        DB_HOST, DB_USER, DB_PASS, DB_NAME, S3_BUCKET, DB_NAME + "_" + timestamp)
    subprocess.Popen(command, shell=True).wait()
    print("MySQL backup finished")
    return "backup finished"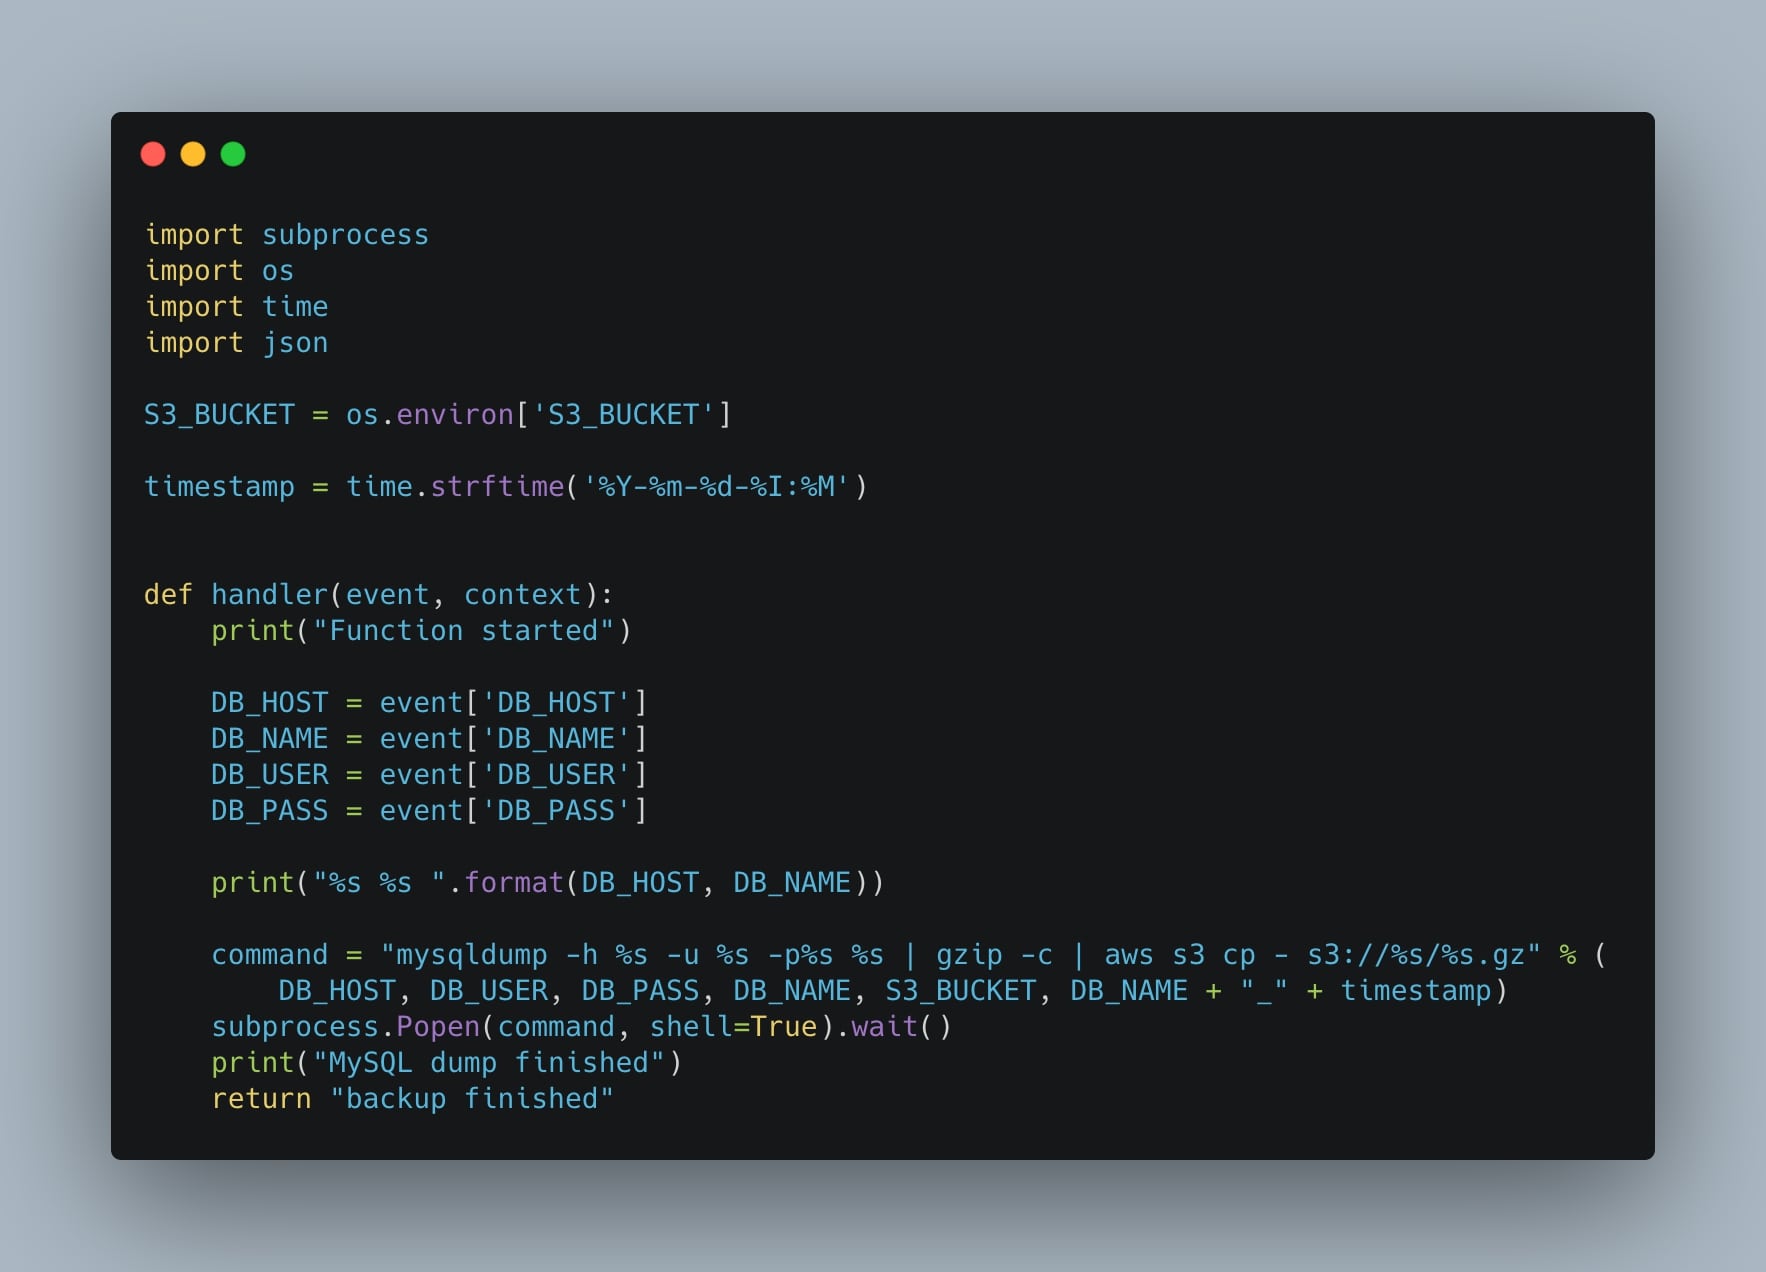
Basically, we are wrapping a bash command using, in this case, a Python subprocess. Also, to make the script more reusable we are doing the following:
- we get the database host, name, user, and password from the event to allow us to invoke the function dynamically;
- we retrieve the S3 bucket name from an environment variable to store every export in the same bucket.
Containerizing the script in a Docker image
Let’s now quickly wrap our simple script in a Docker image.
But first, we need some context: why are we using a Docker image? The answer is simple: in this case, we prefer to have full control of the OS and the environment using Docker because the function is highly related to the environment where is executed. Also, we need an environment where mysqldump and the AWS CLI are installed, and a Docker image is a more dynamic, customizable, and safe environment. In general, we don’t need to build a Docker image to work with AWS Lambda but this is the case.
That said, create in the same Python’s script folder a Dockerfile with the following lines:
ARG FUNCTION_DIR="/home/app/"

FROM python:slim-buster

ARG FUNCTION_DIR
RUN mkdir -p ${FUNCTION_DIR}
COPY *.py ${FUNCTION_DIR}

# Installing Lambda image dependencies
RUN apt-get update \
  && apt-get install -y \
  g++ \
  make \
  cmake \
  unzip \
  libcurl4-openssl-dev
RUN python3 -m pip install awslambdaric

# Installing AWS CLI to upload to S3 bucket
RUN  pip3 install \
  awscli

# Installing mysqldump and cleaning apt cache
RUN apt update && apt install -y mariadb-client && \
  apt-get clean autoclean && \
  apt-get autoremove --yes && \
  rm -rf /var/lib/{apt,dpkg,cache,log}/

WORKDIR ${FUNCTION_DIR}
ENTRYPOINT [ "/usr/local/bin/python3", "-m", "awslambdaric" ]
CMD [ "main.handler" ]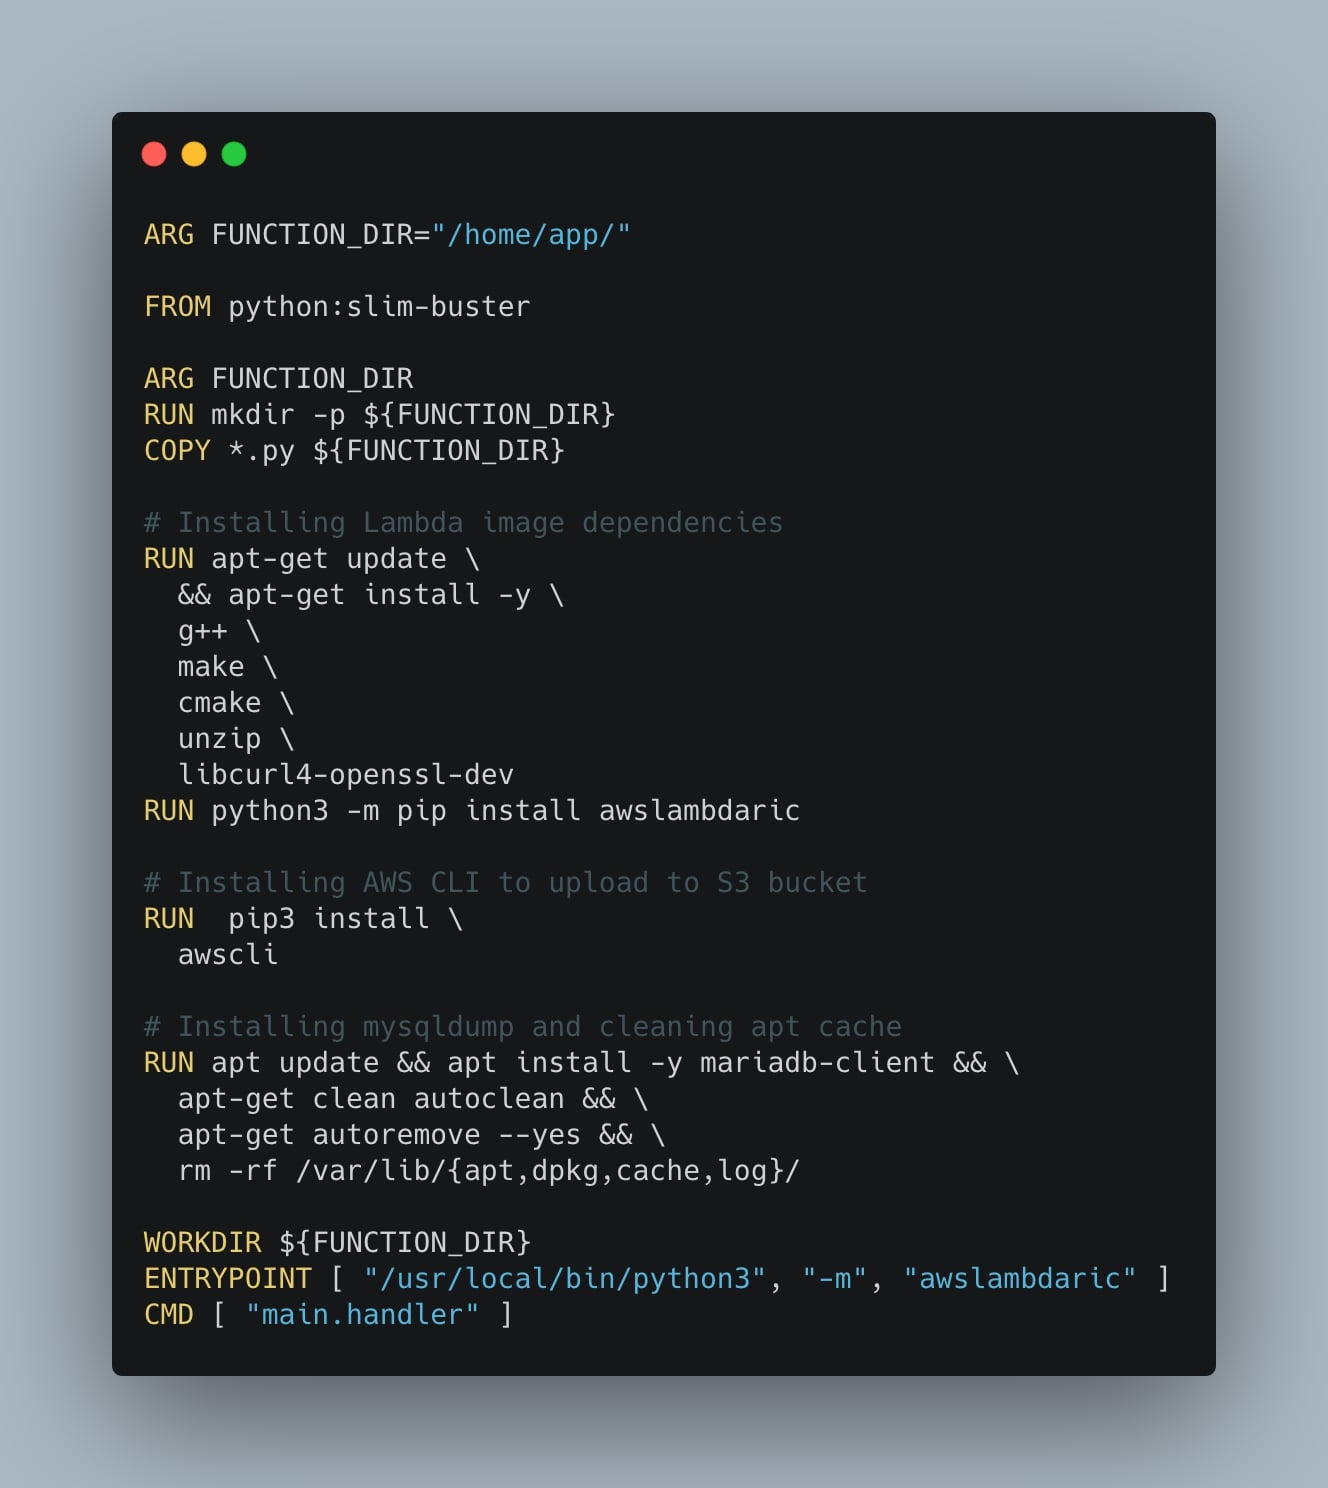
Note that the CMD command exposes “main.handler” where:
- main: is the name of the Python file (“main.py”)
- handler: is the name of the function inside the main file (
def handler())
Create the Elastic Container Registry image
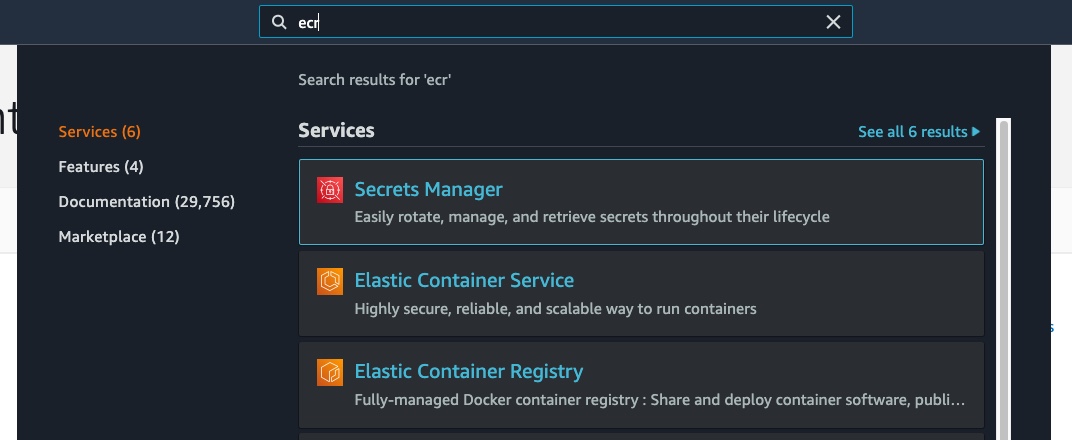
In order to make the script work, we need to create an Elastic Container Registry repository where we will push the Docker image to use in our Lambda function.
To create the repository, let’s search for ECR in the AWS console and click on “Elastic Container Service”:
now click on “Create Repository”, in “Visibility settings” select “Private” and give the repository a name of your choice:
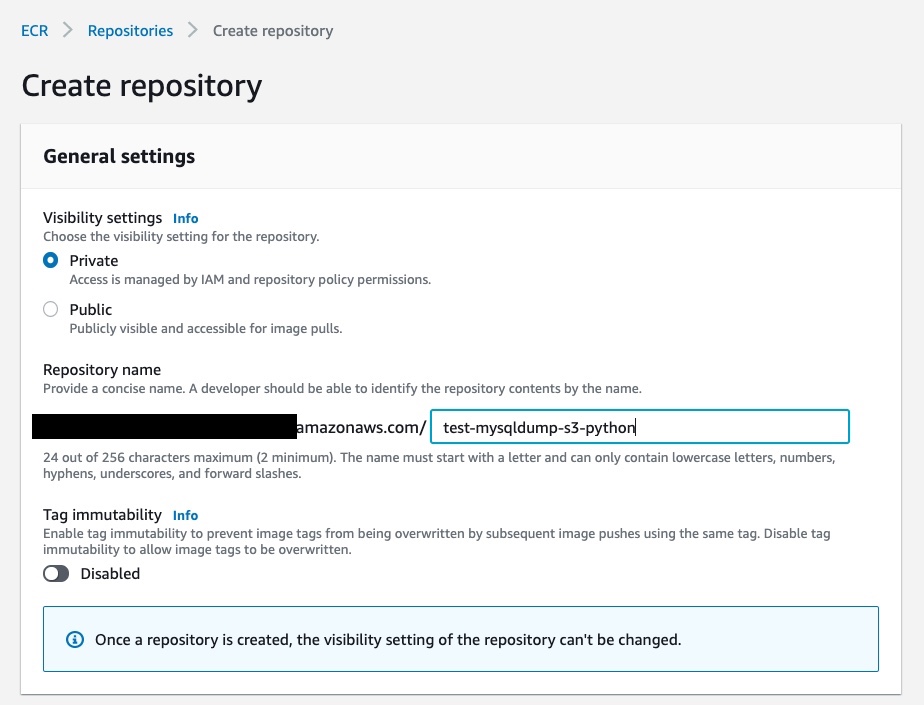
Finally, click again on “Create repository”.
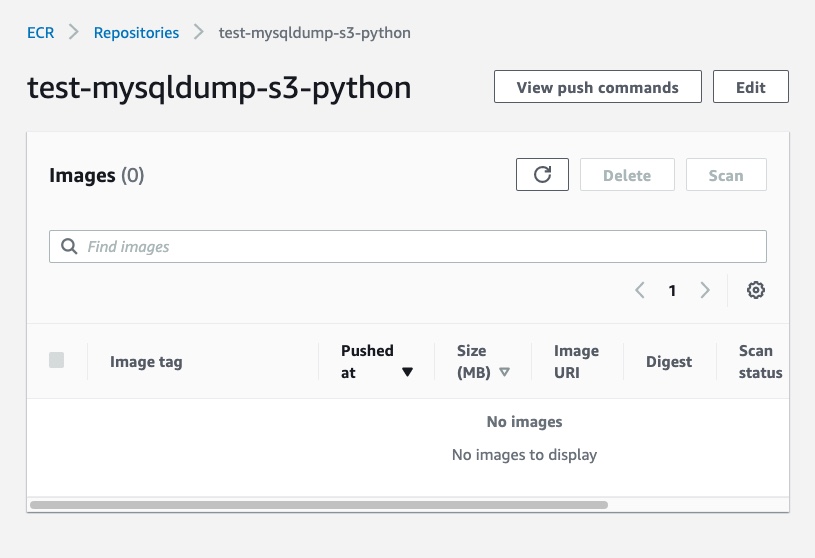
Once you create the repository, you can open the registry details by clicking on the repository name. Right now, there are no images inside it:
To push the image in our repository, click on “View push commands” to open the window with the instructions to follow:
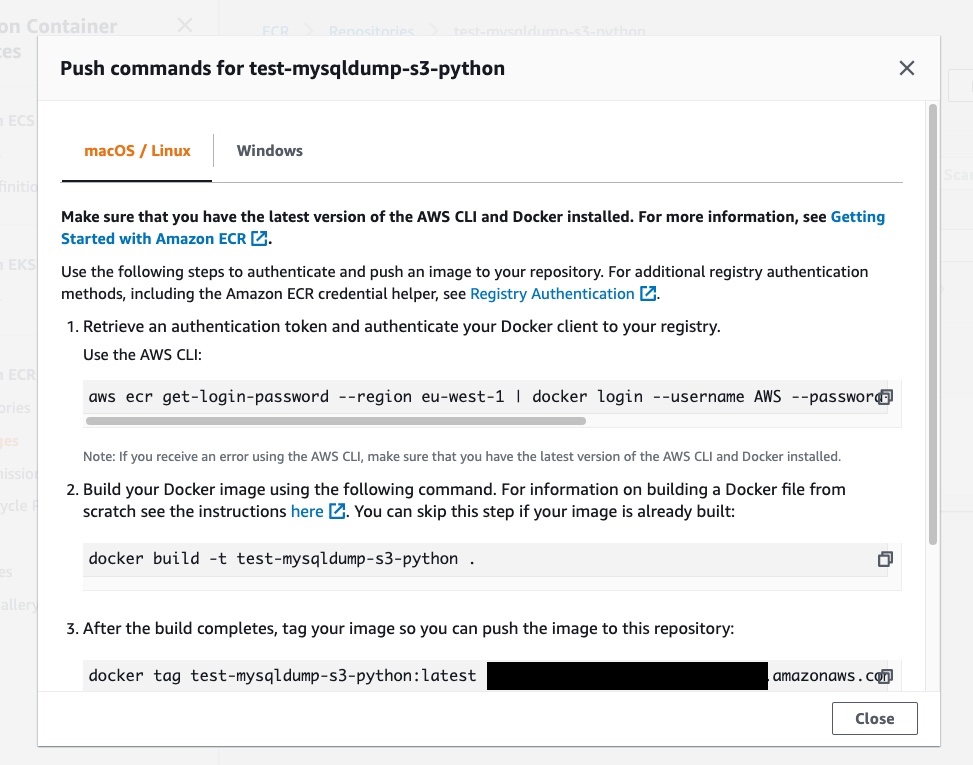
Copy and paste the lines from the instruction to push the image to the Elastic Container Registry. If everything is correct, you’ll see the uploaded image on the dashboard like this:
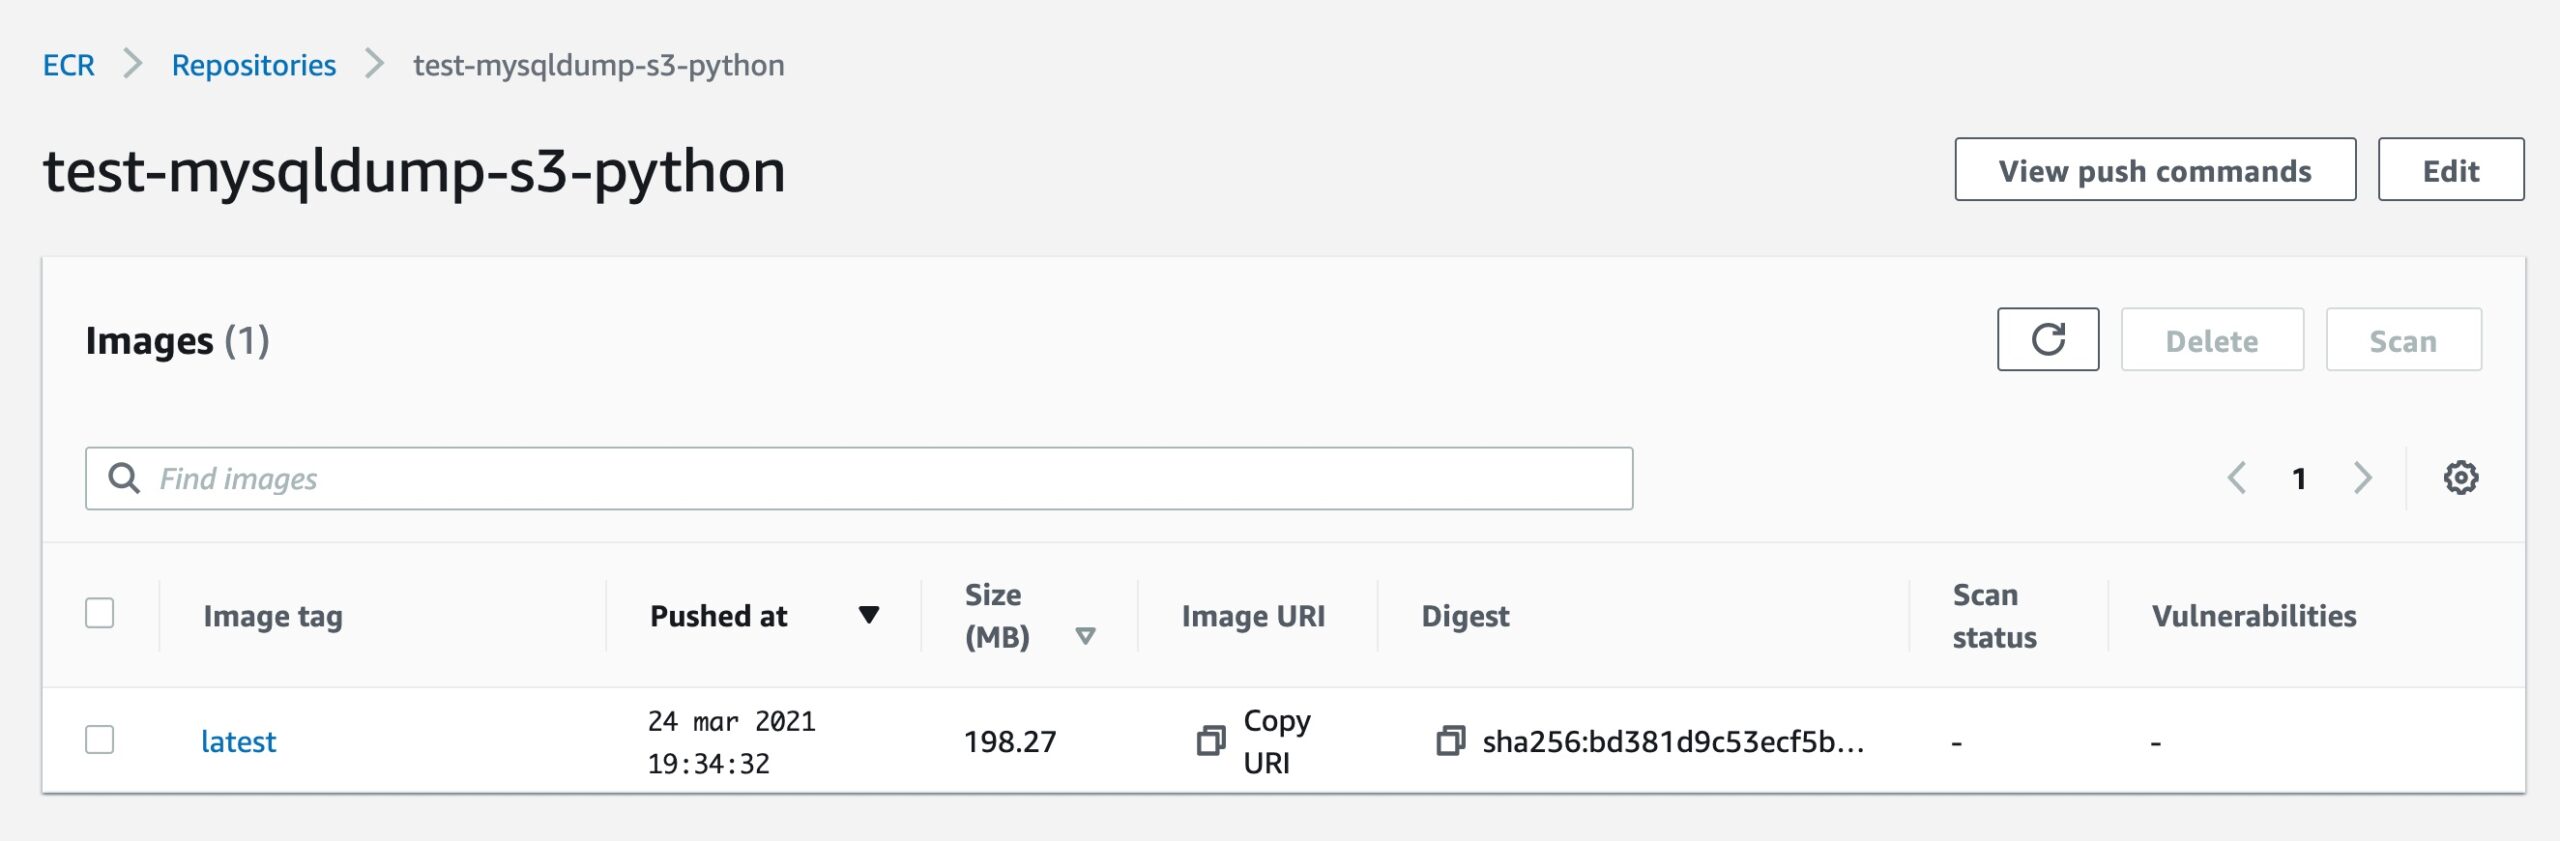
Click on “Copy URI” under the “latest” tag, we will need this in the next step!
Create the CloudFormation stack template
From now on, each AWS resource will be followed by its corresponding CloudFormation template.
The stack is has the following resources:
- Lambda: the serverless function which will execute the Python script and export the MySQL database to the destination S3 bucket using mysqldump and AWS CLI;
- S3: the bucket that will contain every backup generated by the Lamba functions;
- SNS Topic: every time a new export is uploaded into the bucket, we will receive an email notification;
- Lambda Role and Topic Policy: we will handle the permissions between Lambda, S3 bucket, and the SNS Topics;
- Event Rules: one or more scheduled events to trigger the Lambda functions during the day, for one or more databases.
In the following sections, we will see how to create each resource in detail using CloudFormation. If you are not interested in the step-by-step explanation for each resource, you can jump to the end of the article where you find the complete CloudFormation template to fully load the stack.
That’s said, we can start writing the CloudFormation template. Create a cloudformation.yml file with the following lines of code:
AWSTemplateFormatVersion: "2010-09-09"
Description: MySQL backup to Amazon S3 with Python
Parameters:
  ECRImage:
    Type: String
    Default: xxx.dkr.ecr.REGION.amazonaws.com/IMAGE_NAME:VERSION
    Description: Elastic Container Registry image URL
  CronExpression:
    Type: String
    Default: cron(0 12 * * ? *)
    Description: Cron expression for MySQLdump event
Resources:
  # ...here we will create every stack resource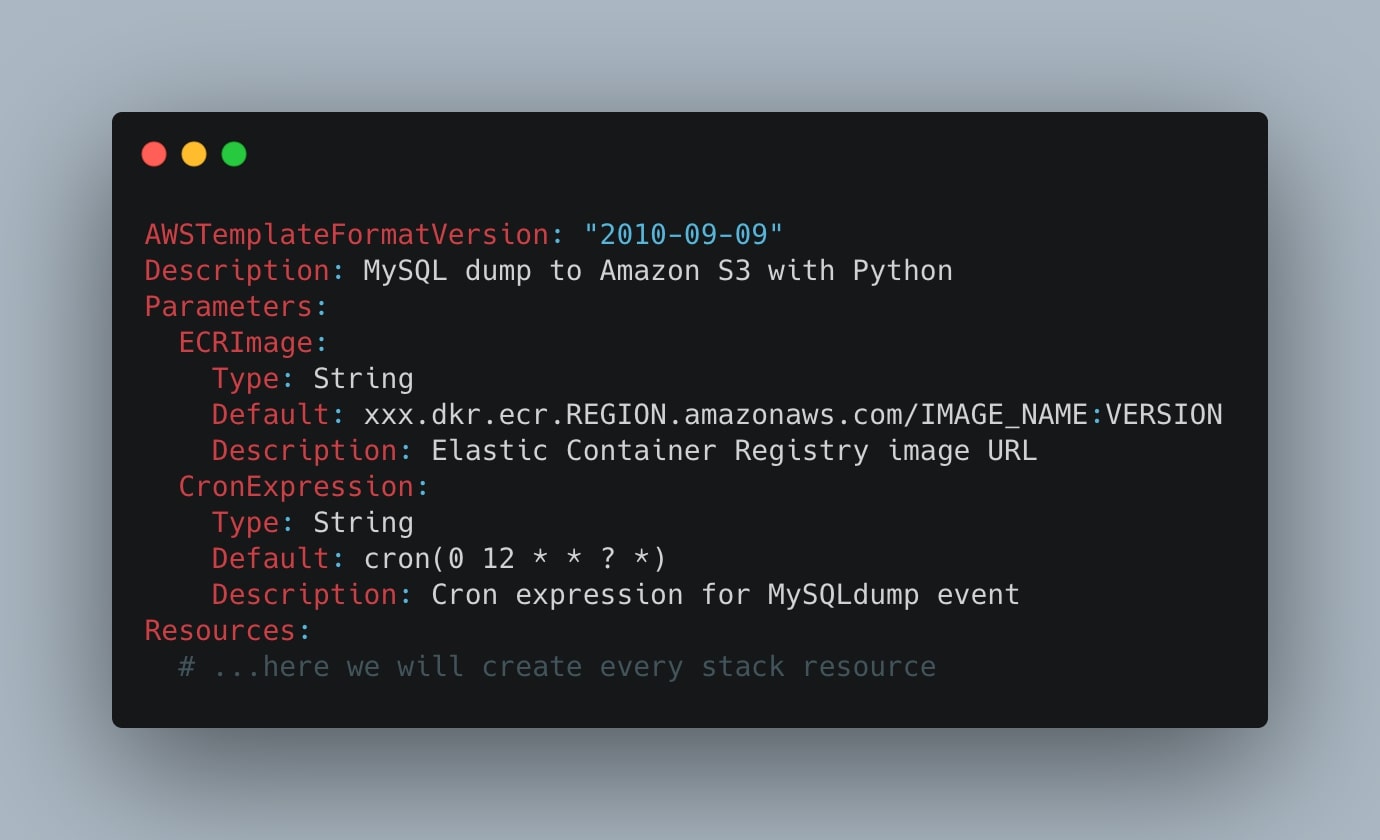
The parameters are variables in the CloudFormation template we can use as references to other resources. In particular:
- ECRImage: paste in
ECRImage.Defaultthe link to the Elastic Container Registry latest image; - CronExpression: in
CronExpression.Defaultinsert the cron expression in thecron(field)format to specify when the Python script will be triggered during the day. For more info, take a look at the official AWS schedule expression documentation page.
Create Lambda function to export MySQL database to S3 Bucket
At this point, we need to create a Lambda function from the Elastic Container Registry image we have previously created. As we already said, the Lambda function will execute the Python script to connect and export the database and upload the backup to an Amazon S3.
Take a look at the following template:
Lambda:
  Type: AWS::Lambda::Function
  Properties:
    Code:
      ImageUri: !Ref ECRImage
    Description: Python Lambda Function to mysqldump
    Environment:
      Variables:
        S3_BUCKET: !Ref Bucket
    FunctionName: !Join ["-", [!Ref AWS::StackName, "lambda"]]
    MemorySize: 512
    PackageType: Image
    Timeout: 300
    Role: !GetAtt LambdaRole.Arn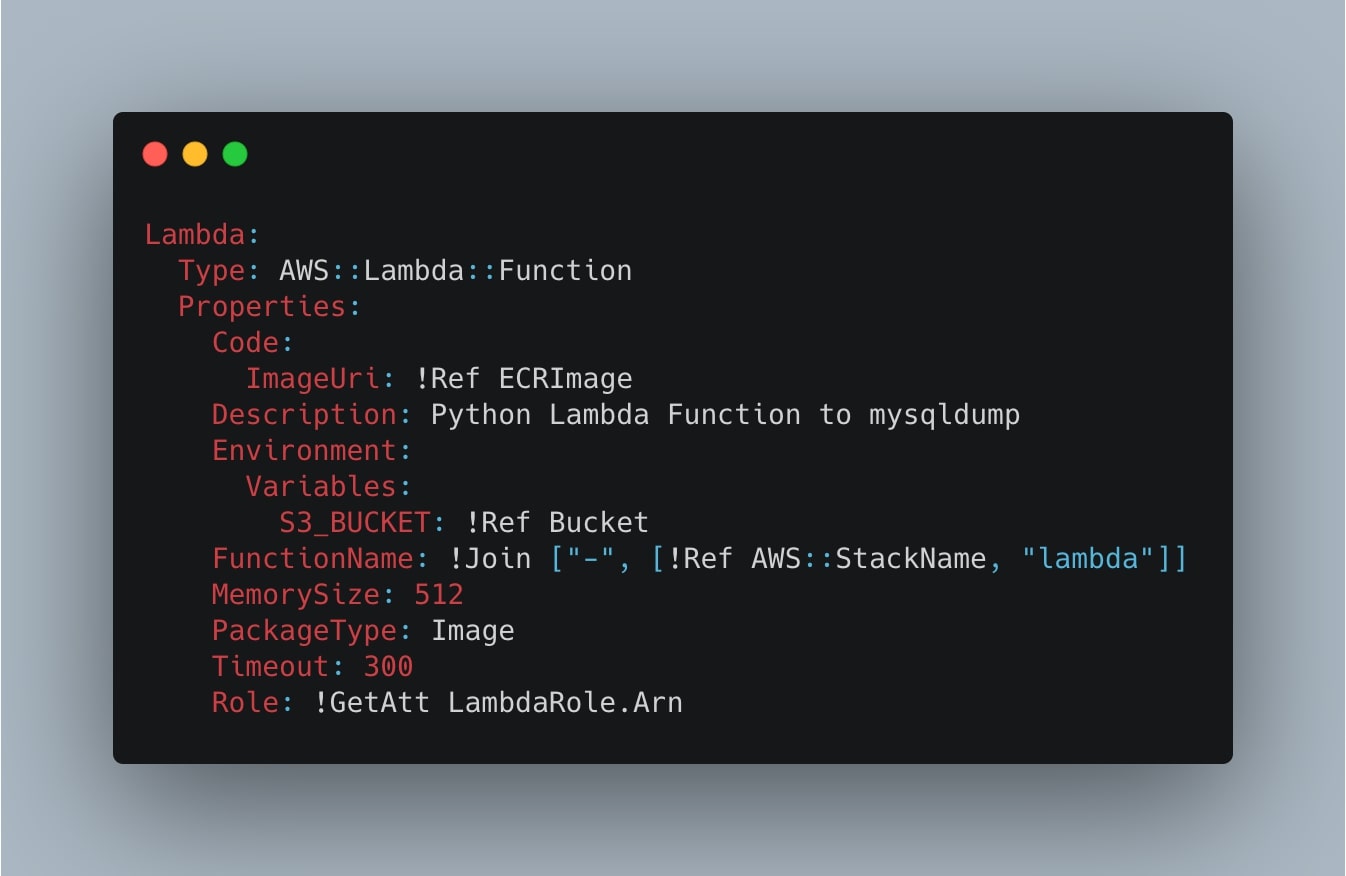
Some of the values are references from other resources:
- ECRImage: the Elastic Container Registry image link;
- Bucket: the S3 bucket name is passed as an environment variable;
- FunctionName: generated using the stack name, followed by
-lambdasuffix; - Role: the Lambda Role Arn that we will create in the next step.
Keep in mind that you can also customize some properties. In particular, note the Timeout: 300 and MemorySize: 512. You should adjust these values based on your needs; if you are planning to export a large amount of data and tables, you would probably set higher values.
The Lambda cost is based on the execution time and memory of the function. For more information about Lambda pricing, please take a look at the official AWS documentation.
Let’s now create the Lambda Role to give the function the privileges to PutObjects into the S3 bucket:
LambdaRole:
  Type: AWS::IAM::Role
  Properties:
    AssumeRolePolicyDocument:
      Statement:
        - Effect: Allow
          Principal:
            Service:
              - lambda.amazonaws.com
          Action:
            - sts:AssumeRole
    Policies:
      - PolicyName: S3Policy
        PolicyDocument:
          Statement:
            - Action:
                - s3:PutObject
              Effect: Allow
              Resource:
                - !Join ["", ["arn:aws:s3:::", !Ref Bucket, "/*"]]
    ManagedPolicyArns:
      - arn:aws:iam::aws:policy/service-role/AWSLambdaBasicExecutionRole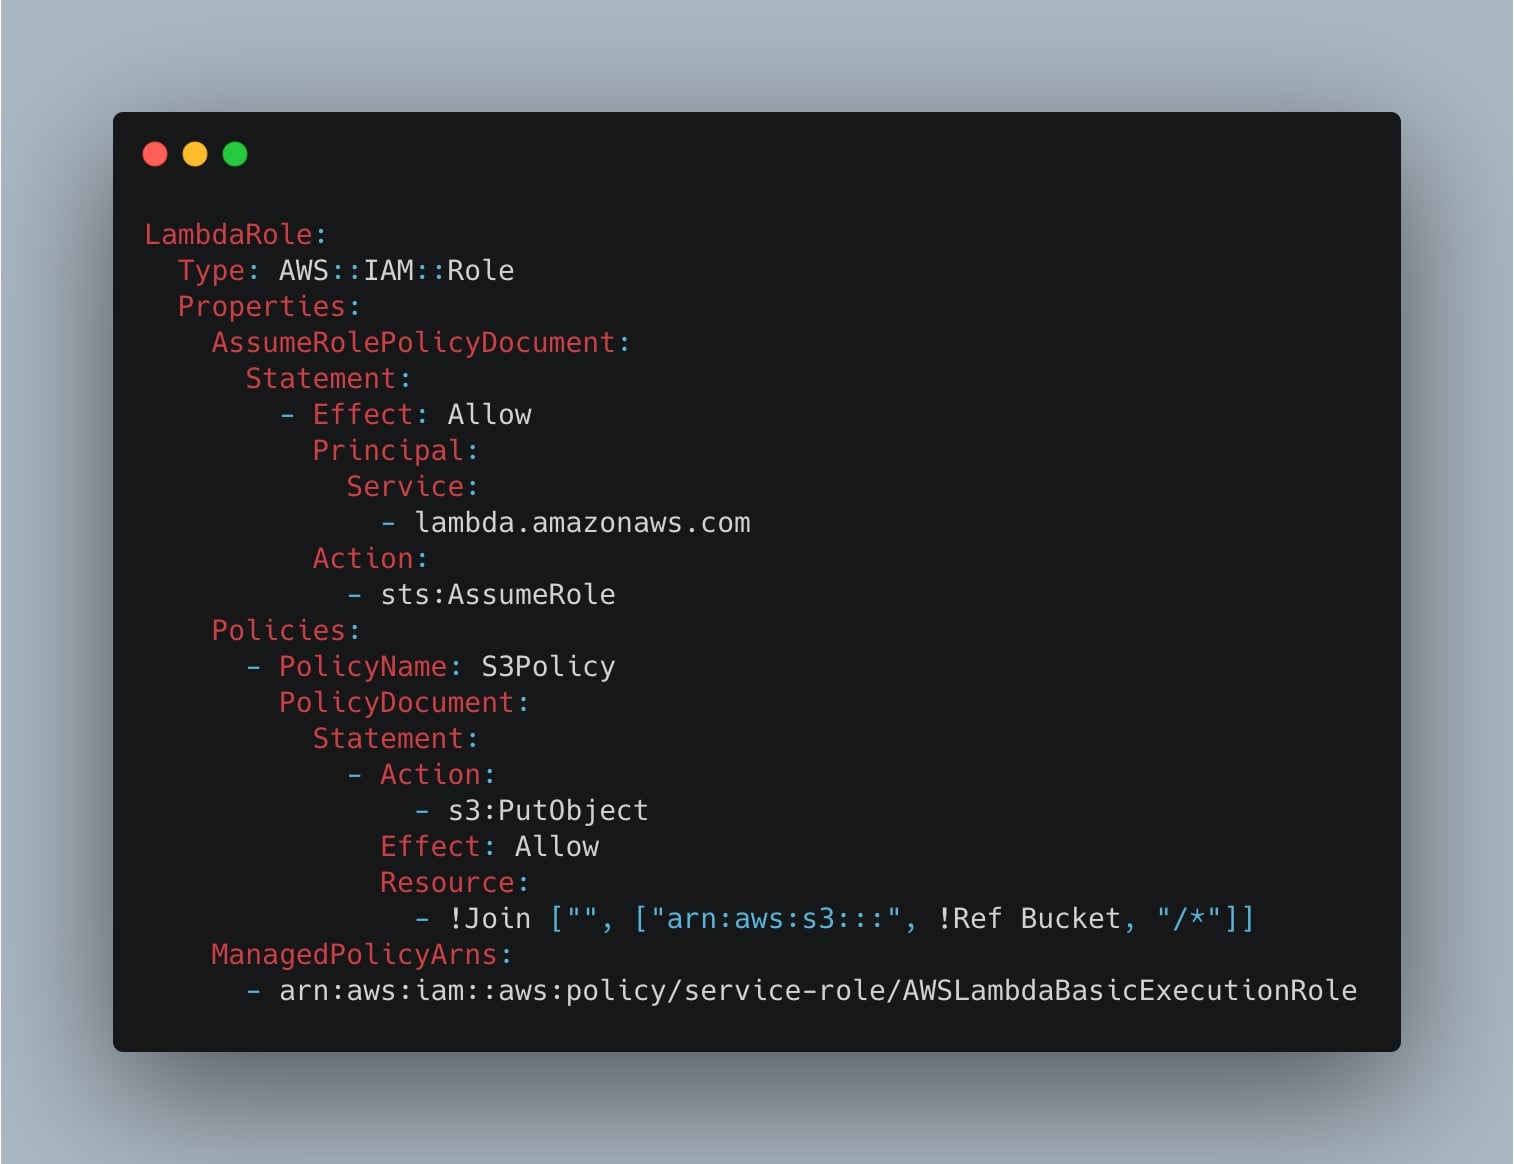
In particular, into the Policies, we create the “S3Policy” which allows the function to s3:PutObject into the S3 bucket.
Create the Amazon S3 Bucket to store the MySQL backups
Now we have to create the Amazon S3 bucket resource where the Python script will store the MySQL exports. To do so, we can simply add:
Bucket:
  Type: AWS::S3::Bucket
  DependsOn:
    - SNSTopicPolicy
  Properties:
    BucketName: !Join ["-", [!Ref AWS::StackName, "bucket"]]
    AccessControl: Private
    PublicAccessBlockConfiguration:
      BlockPublicAcls: True
      BlockPublicPolicy: True
      IgnorePublicAcls: True
      RestrictPublicBuckets: True
    LifecycleConfiguration:
      Rules:
        - Id: GlacierRule
          Status: Enabled
          Transitions:
            - TransitionInDays: "1"
              StorageClass: GLACIER
    NotificationConfiguration:
      TopicConfigurations:
        - Topic: !Ref Topic
          Event: s3:ObjectCreated:*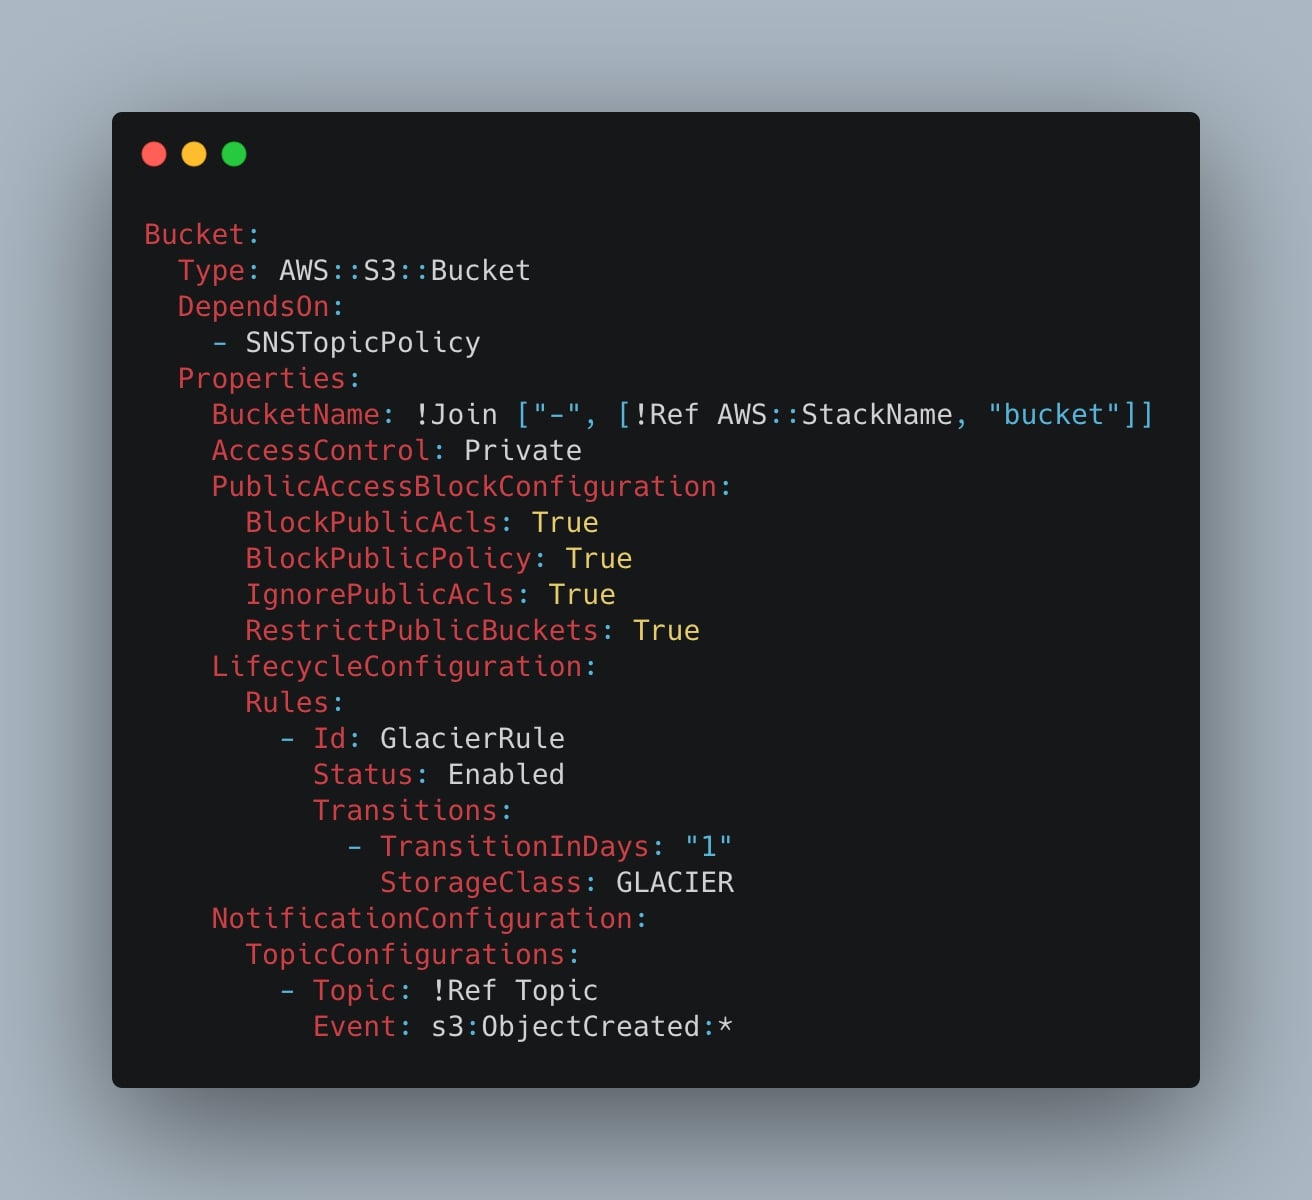
In particular, we are creating the S3 bucket with the following properties:
- AccessControl and PublicAccessBlockConfiguration: we make the S3 bucket private;
- LifecycleConfiguration: after 1 day, every object in the bucket will be transitioned in the Glacier storage, which is a more cost-efficient storage class when we are dealing with backups and with objects that are not frequently accessed;
- NotificationConfiguration: the SNS Topic reference that will send us an email evey time an object is created (
s3:ObjectCreated:*).
Create SNS Topic to send an email when the script creates an S3 object
We create now a simple SNS Topic which will send us an email every time the Python script will upload an object into the S3 bucket. To do so, we just need to add:
Topic:
  Type: AWS::SNS::Topic
  Properties:
    DisplayName: !Join ["-", [!Ref AWS::StackName, "topic"]]
    TopicName: !Join ["-", [!Ref AWS::StackName, "topic"]]
    Subscription:
      - Protocol: email
        Endpoint: myemail@example.com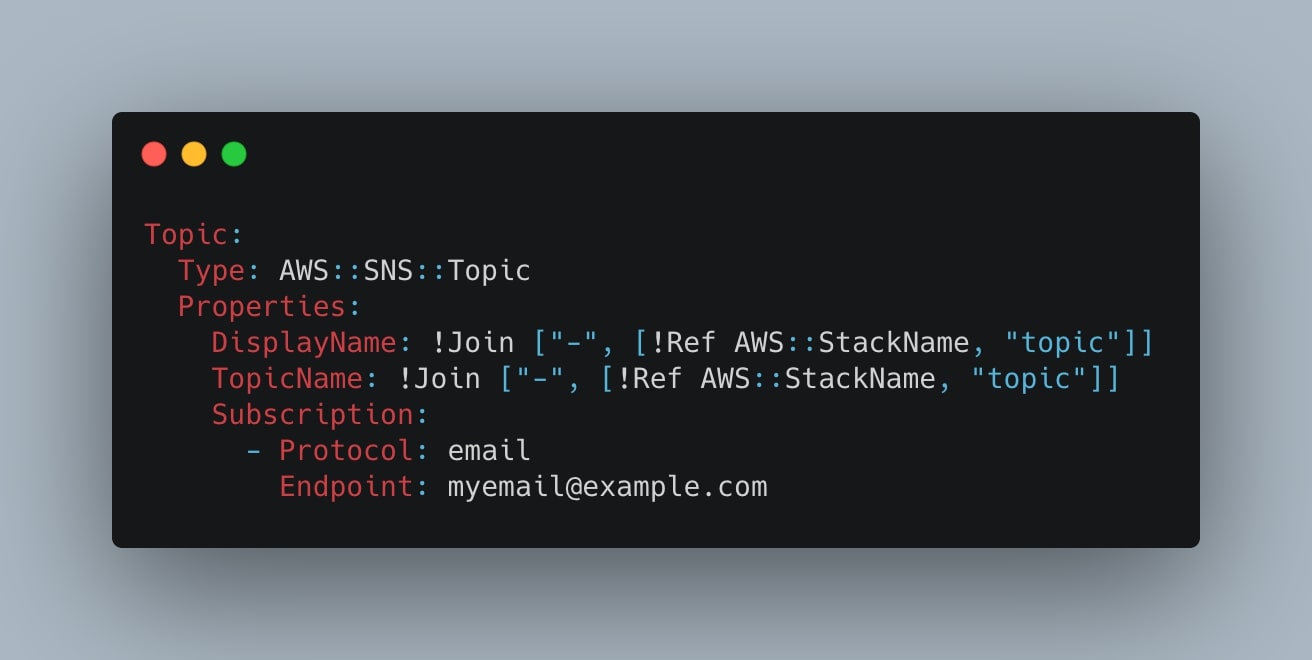
This is straight forward, in particular the following properties:
- Subscription.Protocol: “email” is how the topic will notify us;
- Subscription.Endpoint: is where it will notify us (insert here your email address).
The last step is to create the TopicPolicy to give the SNS Topic resource the permission to be notified by the AWS S3 bucket when the object is created:
SNSTopicPolicy:
  Type: AWS::SNS::TopicPolicy
  Properties:
    PolicyDocument:
      Statement:
        - Effect: Allow
          Principal:
            Service: s3.amazonaws.com
          Action: sns:Publish
          Resource: !Ref Topic
          Condition:
            ArnLike:
              aws:SourceArn:
                !Join ["", ["arn:aws:s3:::", !Ref AWS::StackName, "-bucket"]]
    Topics:
      - !Ref Topic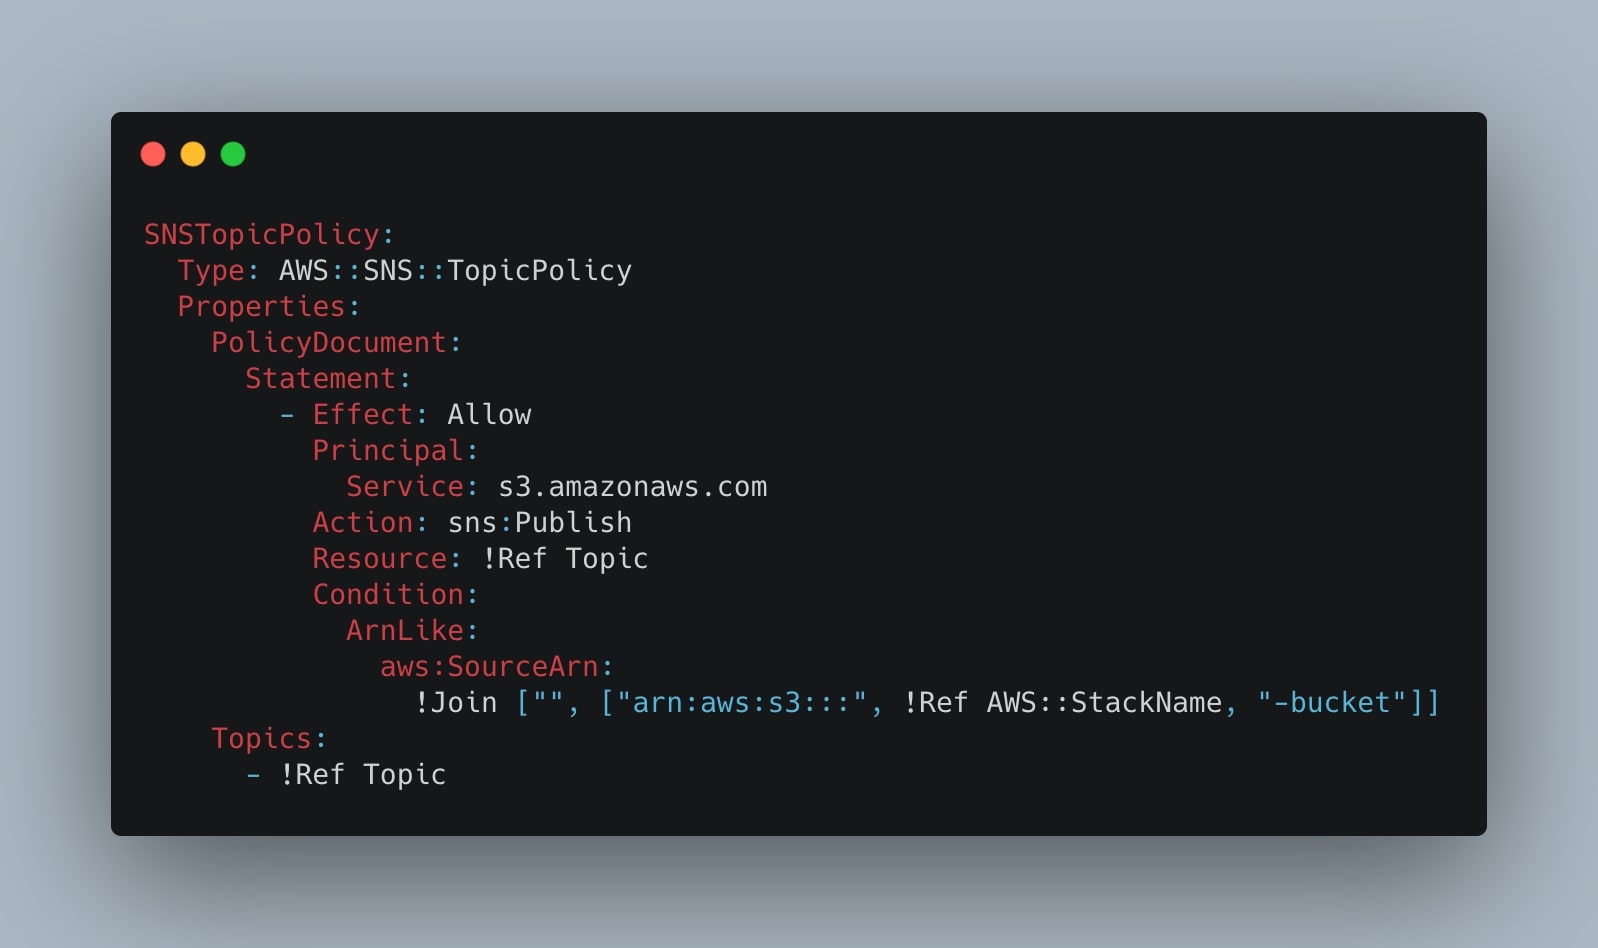
Event Rule to schedule the execution of the Lambda function
Finally, the last step is to create an Event Rule to trigger the Lambda function at a specific daily schedule.
We start adding:
Cron:
  Type: AWS::Events::Rule
  Properties:
    Description: MySQLdump Cron
    Name: !Join ["-", [!Ref AWS::StackName, "cron"]]
    ScheduleExpression: !Ref CronExpression
    State: ENABLED
    Targets:
      - Arn: !GetAtt Lambda.Arn
        Id: Lambda
        Input: >-
          {
            "DB_HOST": "host",
            "DB_NAME": "db",
            "DB_USER": "user",
            "DB_PASS": "example"
          }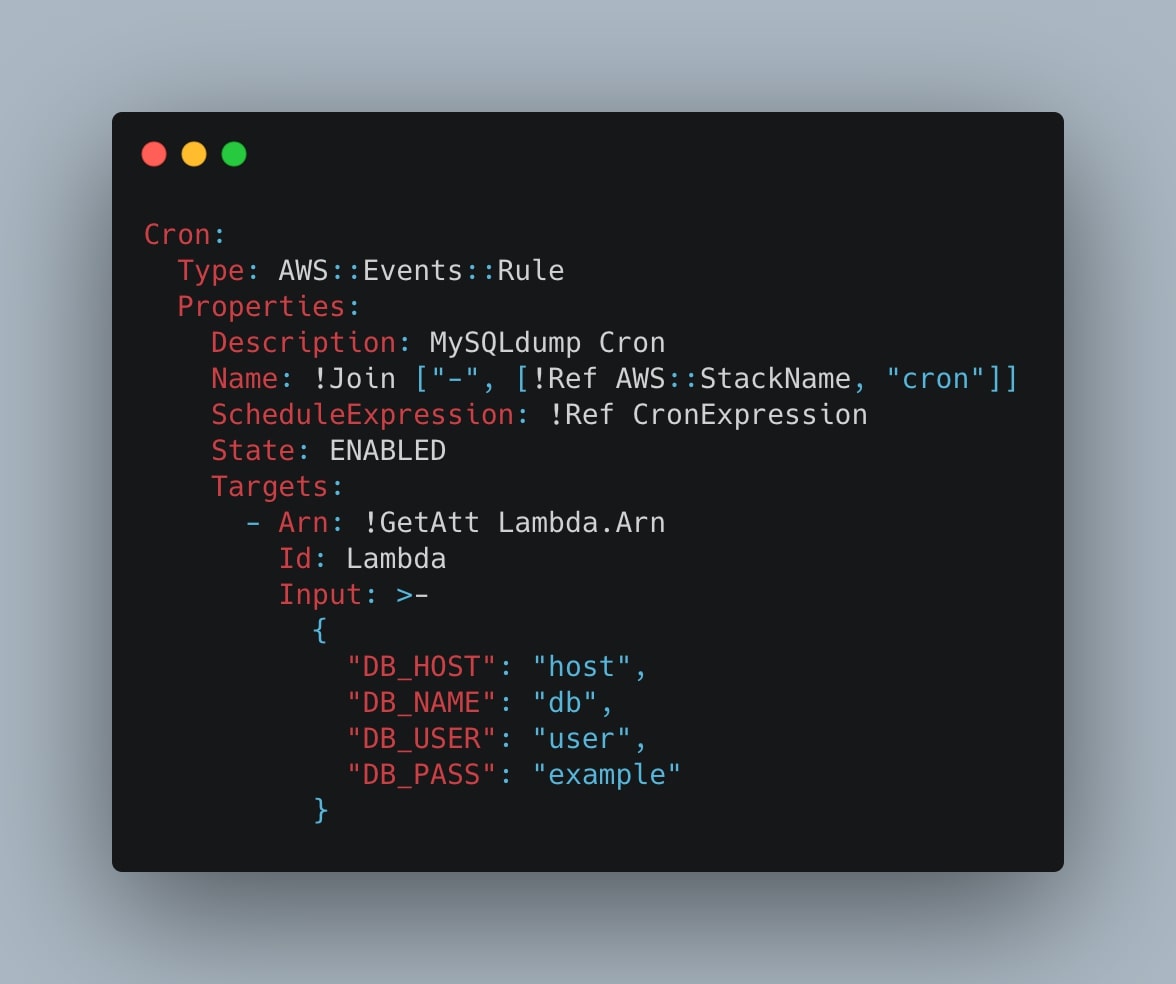
In the Input property, we are defining the event that will be sent to the Lambda function in the form of valid JSON. To be clear, the Event Rule will trigger the Lambda function sending the event with the MySQL database credentials, and the Python script will be executed taking the credentials from that event and uploading the exported data into the S3 bucket.
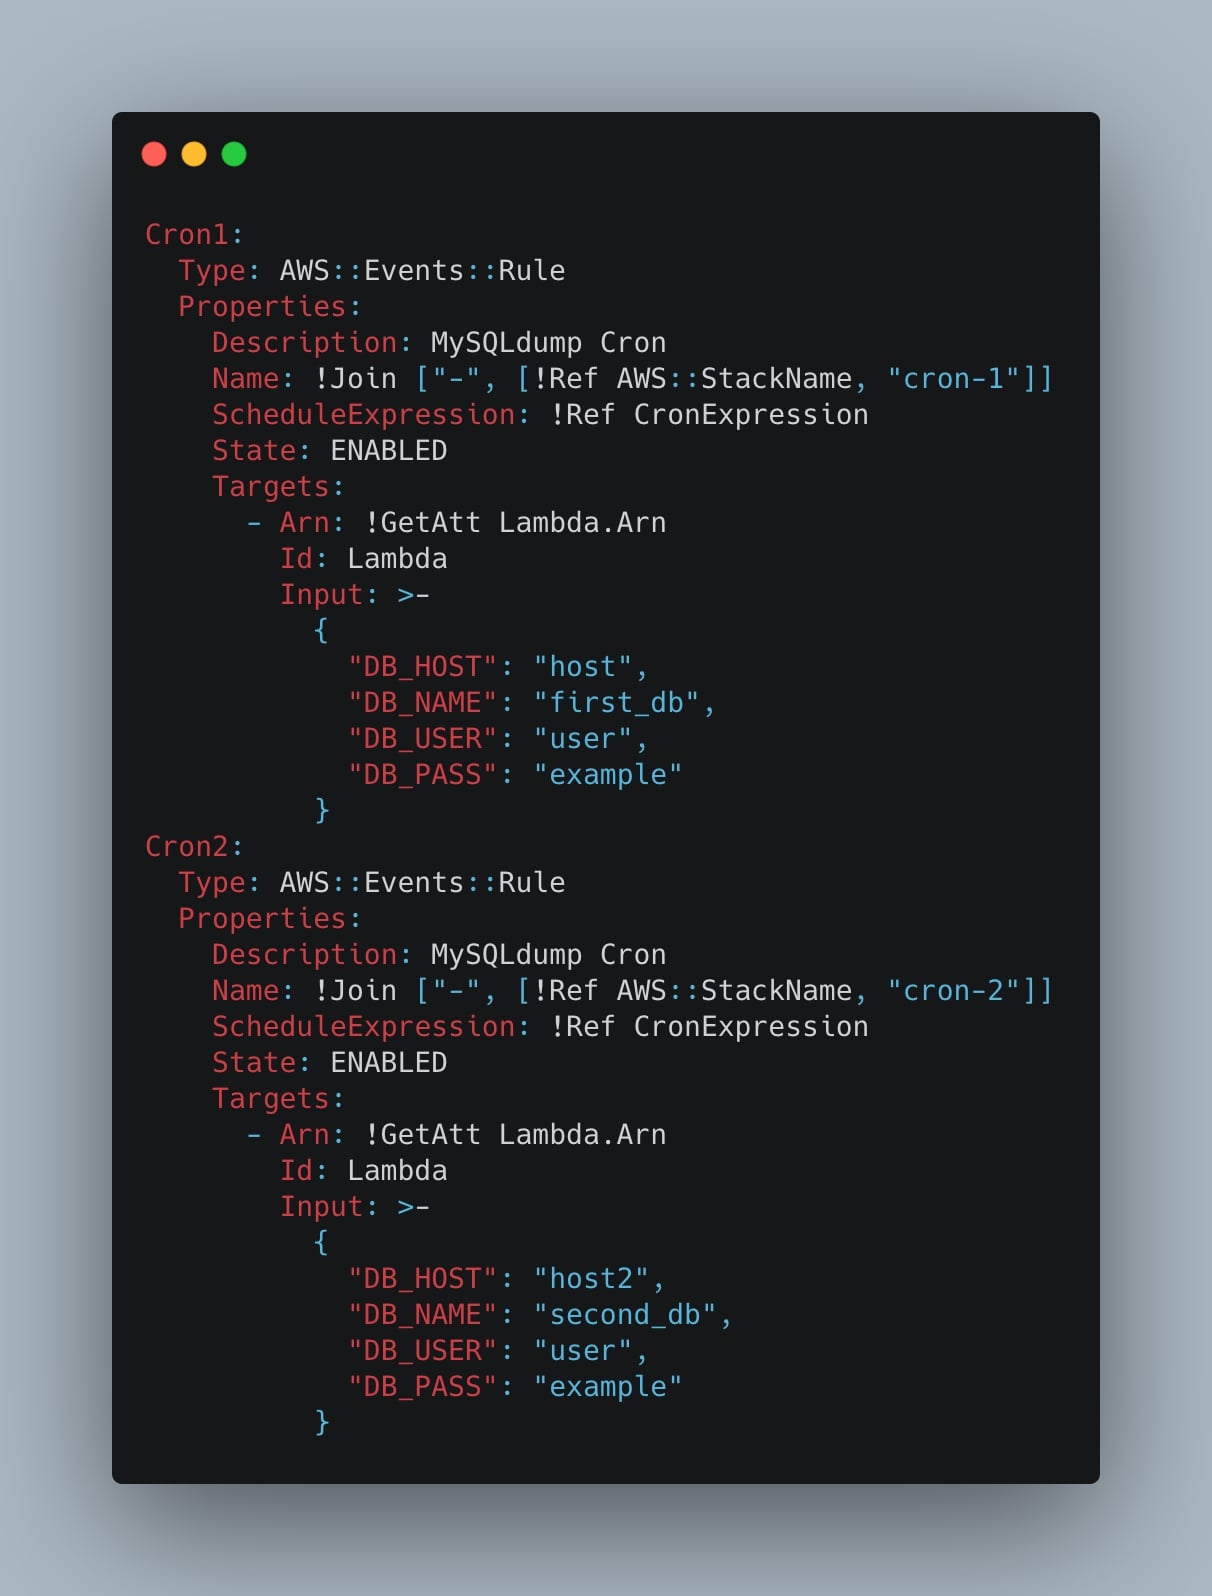
Also, if we want to, we can create multiple event rules in order to schedule multiple MySQL exports. One thing to note is that we need to have unique Event Rule names, in particular the Cron.Properties.Name property must be different for each cron we define. This is an example:
Cron1:
  Type: AWS::Events::Rule
  Properties:
    Description: MySQLdump Cron
    Name: !Join ["-", [!Ref AWS::StackName, "cron-1"]]
    ScheduleExpression: !Ref CronExpression
    State: ENABLED
    Targets:
      - Arn: !GetAtt Lambda.Arn
        Id: Lambda
        Input: >-
          {
            "DB_HOST": "host",
            "DB_NAME": "first_db",
            "DB_USER": "user",
            "DB_PASS": "example"
          }
Cron2:
  Type: AWS::Events::Rule
  Properties:
    Description: MySQLdump Cron
    Name: !Join ["-", [!Ref AWS::StackName, "cron-2"]]
    ScheduleExpression: !Ref CronExpression
    State: ENABLED
    Targets:
      - Arn: !GetAtt Lambda.Arn
        Id: Lambda
        Input: >-
          {
            "DB_HOST": "host2",
            "DB_NAME": "second_db",
            "DB_USER": "user",
            "DB_PASS": "example"
          }
Deploy the CloudFormation stack
To deploy the CloudFormation stack, open a terminal window and go to the folder where the “cloudformation.yml” file is located. Once in the right directory, run the following command:
aws cloudformation deploy --template-file cloudformation.yml --stack-name YOUR_STACK_NAME --capabilities CAPABILITY_NAMED_IAM
replace YOUR_STACK_NAME with the name that you want to give to the stack. If you want to override some of the parameters that we set up in the stack, you simply need to use the --parameters-override argument, for example:
aws cloudformation deploy --template-file cloudformation.yml --stack-name YOUR_STACK_NAME --parameter-overrides ECRImage=xxxx.dkr.ecr.eu-west-1.amazonaws.com/ANOTHER_ECR_IMAGE:VERSION --capabilities CAPABILITY_NAMED_IAM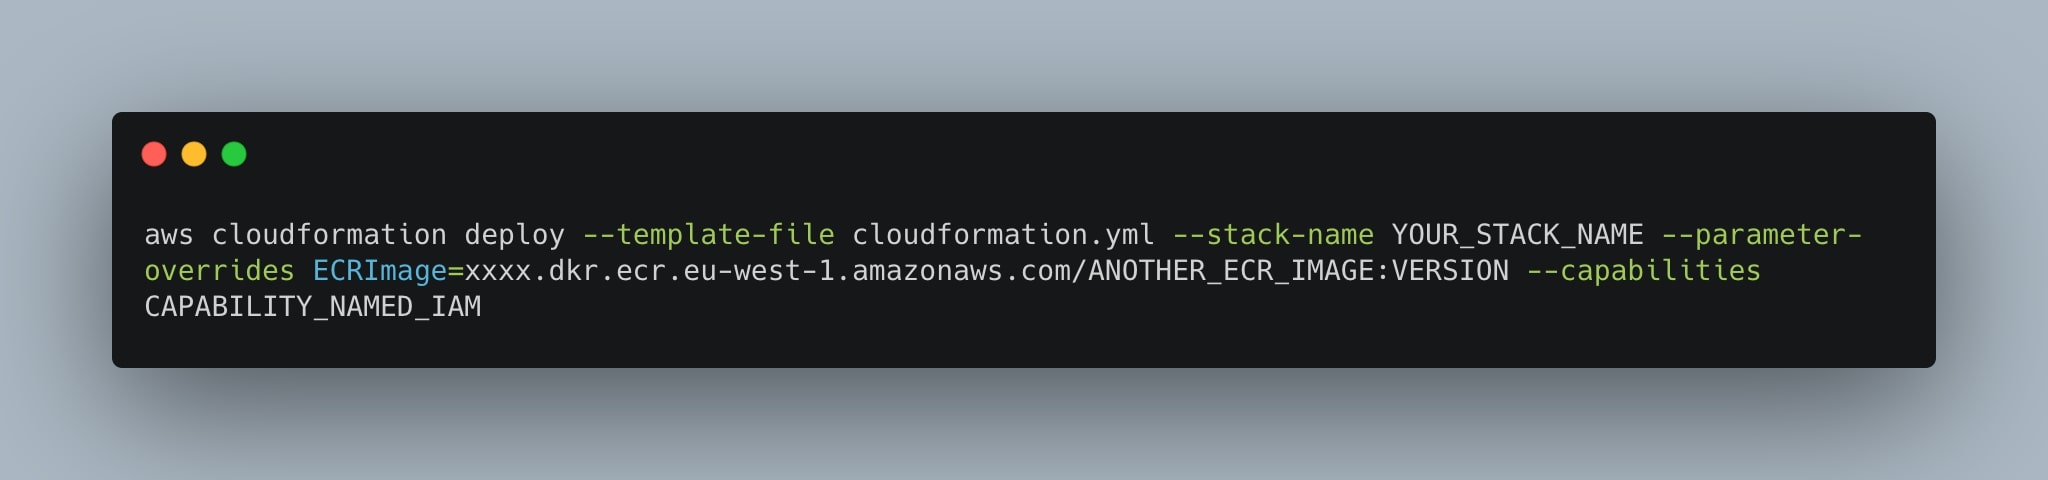
Keep in mind that the CloudFormation template will create the S3 bucket starting from the stack name. Try to give the stack a mostly unique name, so that also the S3 bucket will have a unique name because if the S3 bucket name already exists, you will not able to deploy the stack.
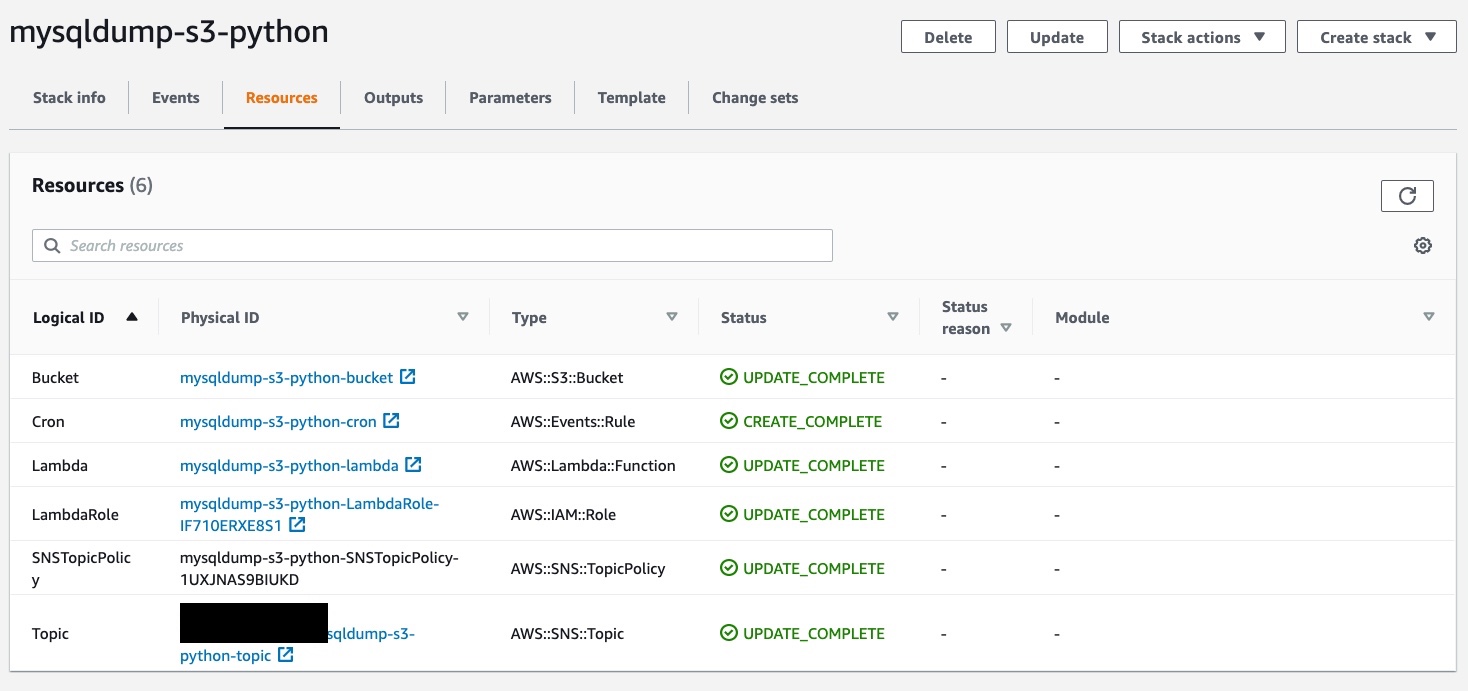
Once deployed the stack, we should see something similar in AWS CloudFormation:
Complete CloudFormation template stack
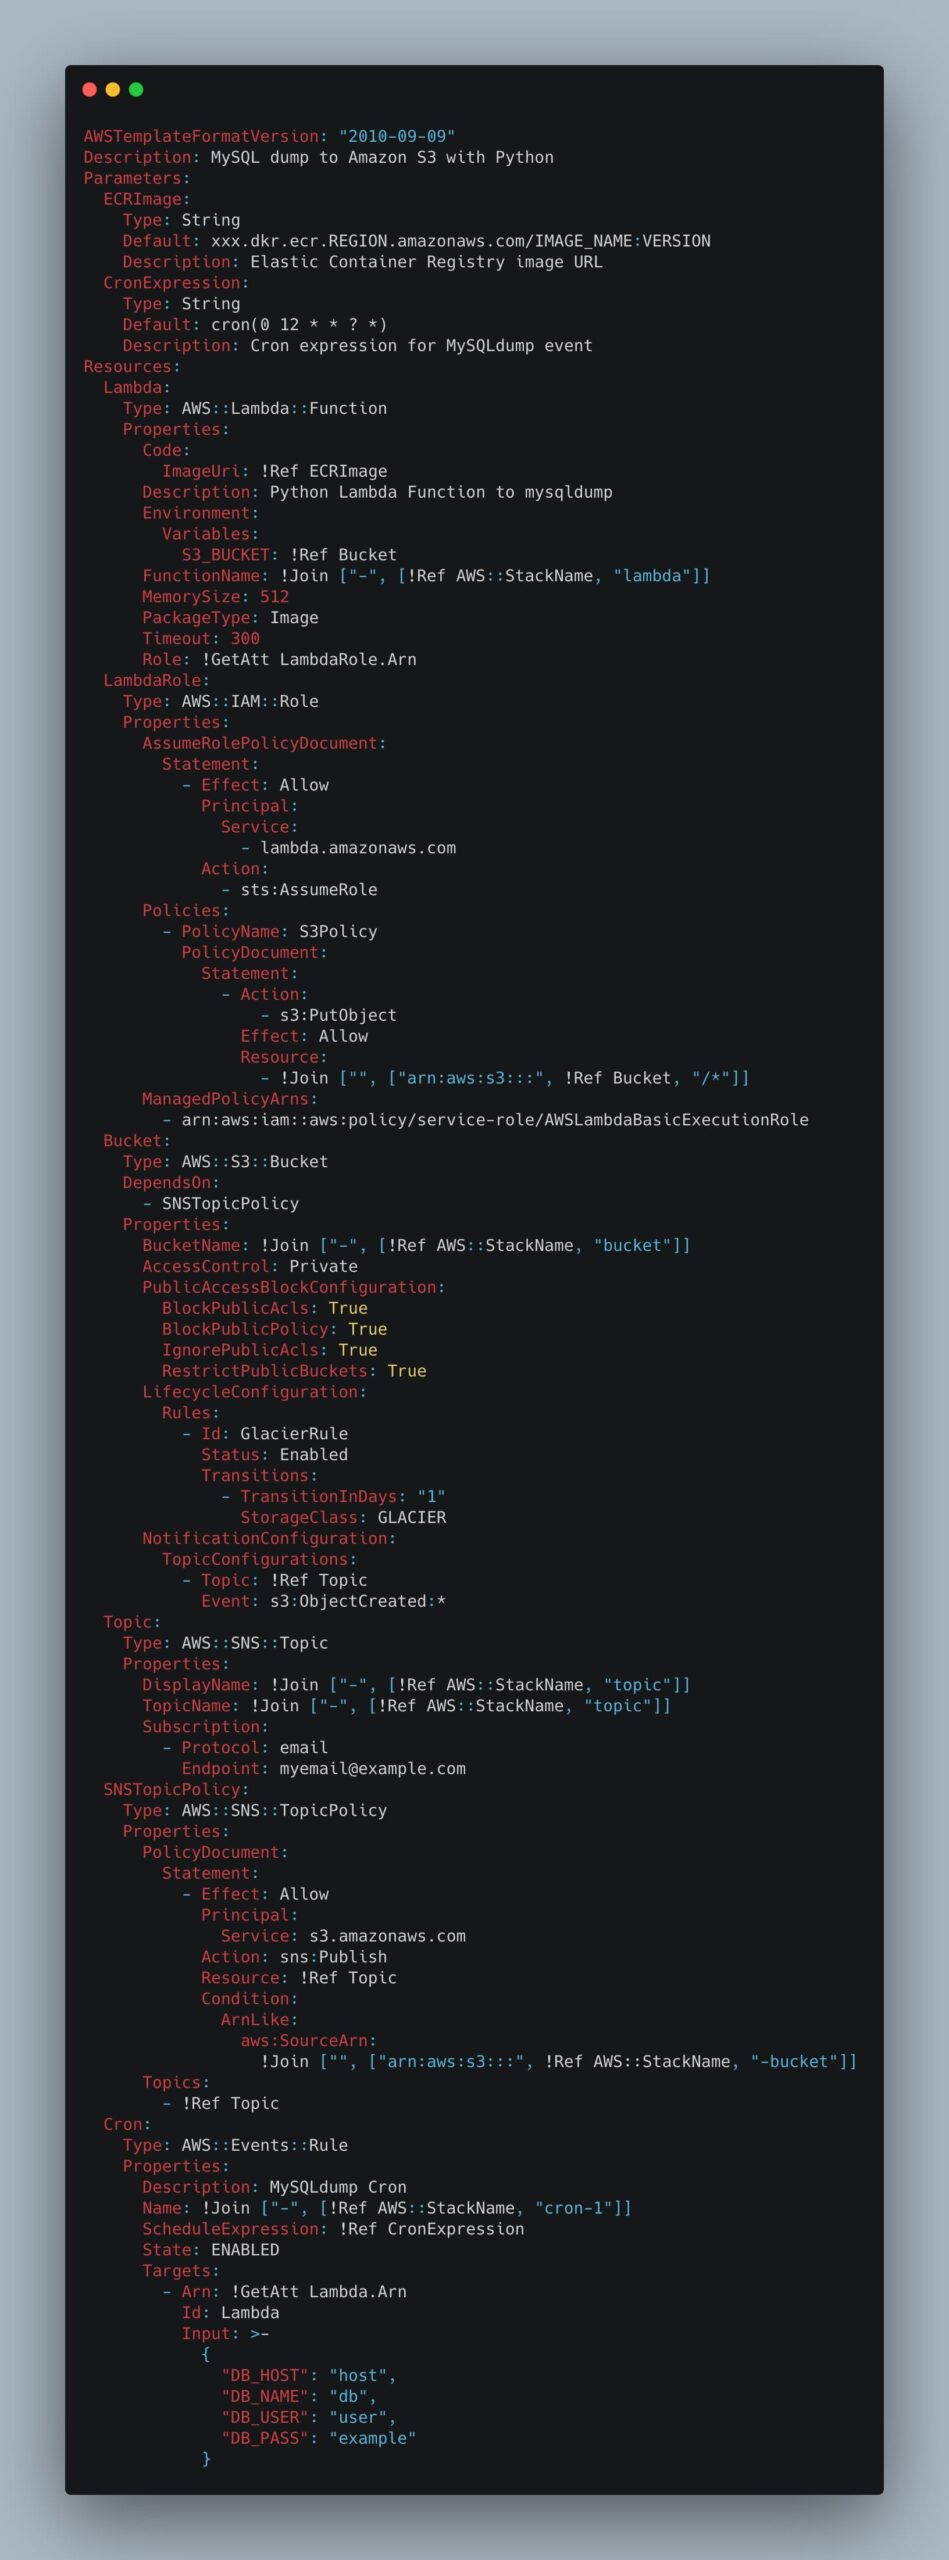
As we promised, this is the complete CloudFormation template:
AWSTemplateFormatVersion: "2010-09-09"
Description: MySQL dump to Amazon S3 with Python
Parameters:
  ECRImage:
    Type: String
    Default: xxx.dkr.ecr.REGION.amazonaws.com/IMAGE_NAME:VERSION
    Description: Elastic Container Registry image URL
  CronExpression:
    Type: String
    Default: cron(0 12 * * ? *)
    Description: Cron expression for MySQLdump event
Resources:
  Lambda:
    Type: AWS::Lambda::Function
    Properties:
      Code:
        ImageUri: !Ref ECRImage
      Description: Python Lambda Function to mysqldump
      Environment:
        Variables:
          S3_BUCKET: !Ref Bucket
      FunctionName: !Join ["-", [!Ref AWS::StackName, "lambda"]]
      MemorySize: 512
      PackageType: Image
      Timeout: 300
      Role: !GetAtt LambdaRole.Arn
  LambdaRole:
    Type: AWS::IAM::Role
    Properties:
      AssumeRolePolicyDocument:
        Statement:
          - Effect: Allow
            Principal:
              Service:
                - lambda.amazonaws.com
            Action:
              - sts:AssumeRole
      Policies:
        - PolicyName: S3Policy
          PolicyDocument:
            Statement:
              - Action:
                  - s3:PutObject
                Effect: Allow
                Resource:
                  - !Join ["", ["arn:aws:s3:::", !Ref Bucket, "/*"]]
      ManagedPolicyArns:
        - arn:aws:iam::aws:policy/service-role/AWSLambdaBasicExecutionRole
  Bucket:
    Type: AWS::S3::Bucket
    DependsOn:
      - SNSTopicPolicy
    Properties:
      BucketName: !Join ["-", [!Ref AWS::StackName, "bucket"]]
      AccessControl: Private
      PublicAccessBlockConfiguration:
        BlockPublicAcls: True
        BlockPublicPolicy: True
        IgnorePublicAcls: True
        RestrictPublicBuckets: True
      LifecycleConfiguration:
        Rules:
          - Id: GlacierRule
            Status: Enabled
            Transitions:
              - TransitionInDays: "1"
                StorageClass: GLACIER
      NotificationConfiguration:
        TopicConfigurations:
          - Topic: !Ref Topic
            Event: s3:ObjectCreated:*
  Topic:
    Type: AWS::SNS::Topic
    Properties:
      DisplayName: !Join ["-", [!Ref AWS::StackName, "topic"]]
      TopicName: !Join ["-", [!Ref AWS::StackName, "topic"]]
      Subscription:
        - Protocol: email
          Endpoint: myemail@example.com
  SNSTopicPolicy:
    Type: AWS::SNS::TopicPolicy
    Properties:
      PolicyDocument:
        Statement:
          - Effect: Allow
            Principal:
              Service: s3.amazonaws.com
            Action: sns:Publish
            Resource: !Ref Topic
            Condition:
              ArnLike:
                aws:SourceArn:
                  !Join ["", ["arn:aws:s3:::", !Ref AWS::StackName, "-bucket"]]
      Topics:
        - !Ref Topic
  Cron:
    Type: AWS::Events::Rule
    Properties:
      Description: MySQLdump Cron
      Name: !Join ["-", [!Ref AWS::StackName, "cron-1"]]
      ScheduleExpression: !Ref CronExpression
      State: ENABLED
      Targets:
        - Arn: !GetAtt Lambda.Arn
          Id: Lambda
          Input: >-
            {
              "DB_HOST": "host",
              "DB_NAME": "db",
              "DB_USER": "user",
              "DB_PASS": "example"
            }